Photography moodboard: a shoot-ready planning guide
Create a photography moodboard that explains light, crop and subject direction. Use a feasibility worksheet to turn references into shots and fallback plans.
Direct answer
A photography moodboard is a selected set of references for a shoot's light, composition, subject treatment and overall mood. Annotate what you want from each image, then check whether it is feasible with the location, equipment and time available. Translate approved references into a shot list with a fallback for fragile conditions.
What should a photography moodboard include?
A photography moodboard includes the shoot purpose, intended deliverables and references for light, crop, subject treatment, color relationships and setting. Caption the part of each image that matters. A photograph might contribute only empty space or shadow softness. Without an explanation, people can read the same picture as instructions for different shots.
Milanote's photography guide covers direction, imagery, color, explanation and feedback.[1]
One vendor's guide, published by Storyflow, connects moodboards with shoot decisions.[2]
The worksheet below adds a feasibility handoff: identify the conditions a reference depends on, who will check them and what to do if those conditions change. It is a planning example, not evidence that a particular setup has been tested.
Use a reference-to-shot feasibility worksheet
Write the desired result, observable cue, proposed setup, unresolved dependency and fallback for each important reference. Separate observation from inference. 'Soft shadow beside the object' is visible. 'Large window to the left' is a proposed explanation unless you have the original setup notes. This distinction lets the photographer develop a workable approach instead of inheriting an unsupported technical claim.
Imagine a product shoot for a small ceramic cup. You want a gentle shadow and room for a headline on the right. The proposed setup uses a diffuse source to the left and a plain surface.
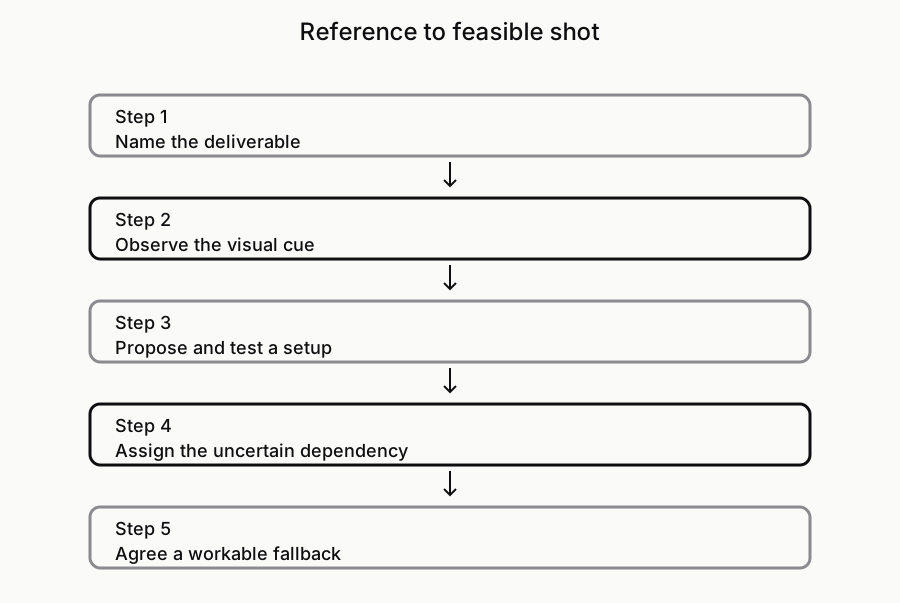
The dependency is access to the intended location at the right time. If that fails, the fallback is another controlled diffuse source with a checked crop. The photographer should test the setup; the reference does not establish camera settings. The worksheet diagram below maps this handoff.
- Deliverable: Where will the image appear, and what space does it need to leave?
- Observed cue: What visible quality are we trying to preserve?
- Proposed setup: How might we create that quality with our resources?
- Dependency and owner: What is unconfirmed, and who will check it?
- Fallback: What changes if the preferred condition is unavailable?
Choose references against the required crop
Evaluate the board against the deliverables before approving the look. A vertical portrait, a wide website banner and a square product listing need different compositions. Show the relevant crop beside the reference or describe its required empty space. Do not assume a strong portrait can be cropped into every format without changing the subject's relationship to the frame.
For the ceramic cup, a wide banner might require open space for copy while a listing image needs the object to read clearly at small size. These may be separate shots. Write that decision into the plan rather than leaving it to the edit. Keep the uncropped reference and its source too; a cropped save alone can hide the original compositional context.
Turn the selected direction into a shot list
Use the moodboard to agree on appearance, then create a shot list to track the actual pictures required. Give each shot an identifier, deliverable, subject, framing note and reference link. Add the setup dependency and fallback where they matter. Keep this list separate from the board so the crew can distinguish visual intent from production work that still needs to happen.
A hypothetical row might read: CUP-A, website banner, cup with handle visible, open space on the right, reference A, diffuse-left setup to test, fallback controlled lighting. A second row could specify the listing view. Avoid assigning exact exposure values from a reference image alone. The photographer needs to confirm the result under the actual conditions rather than reproduce numbers guessed from somebody else's picture.
Resolve the fragile decisions before the shoot
Ask each person responsible for the shoot what the selected direction requires from them. The photographer checks the light and framing; styling checks surfaces and props; the client checks deliverables and subject treatment. Name one person who can approve a change when a condition fails. This keeps the board from becoming a set of promises without an owner.
Record the unresolved questions explicitly: Is the surface available? Does the preferred location permit the setup? Will the crop leave enough room for copy? Which fallback preserves the important quality? Mark a reference as exploratory until the corresponding decision is settled. Share the approved version with the date and keep later changes in the same handoff record.
Keep reusable inspiration outside the production plan
Keep a reusable library for light, texture and composition references, then select a smaller set for the current shoot. Explore the reference workflow in Sesavu and check the documentation for current availability. A library does not replace your shot list, call sheet or photographer's test. Preserve the original sources and keep permissions questions separate from approval of the visual direction.[3][4]
Questions designers ask
What is a mood board for photography?
A photography moodboard is a selected set of references for a shoot's appearance, with captions explaining light, composition and subject treatment. It helps people discuss visual direction. A separate shot list records the pictures required.
How to make a mood board for photography?
Start with the purpose and required image formats, gather relevant references, and annotate the quality each contributes. Check feasibility with the photographer and other responsible people. Select the approved direction, then make a shot list with the important dependencies and fallbacks.
Can a photographer infer camera settings from a moodboard?
A reference can suggest a result to investigate, but the image alone does not establish the original settings or setup. Record uncertain explanations as proposals. Test the result with the equipment, subject and conditions of the actual shoot.
Sources checked
- Milanote's photography moodboard process — Milanote
- Photography moodboard tools and shoot decisions — Storyflow
- Explore Sesavu — Sesavu
- Sesavu documentation — Sesavu